Showing posts with label butterflies. Show all posts

Monday, 23 April 2018

Angel Kisses

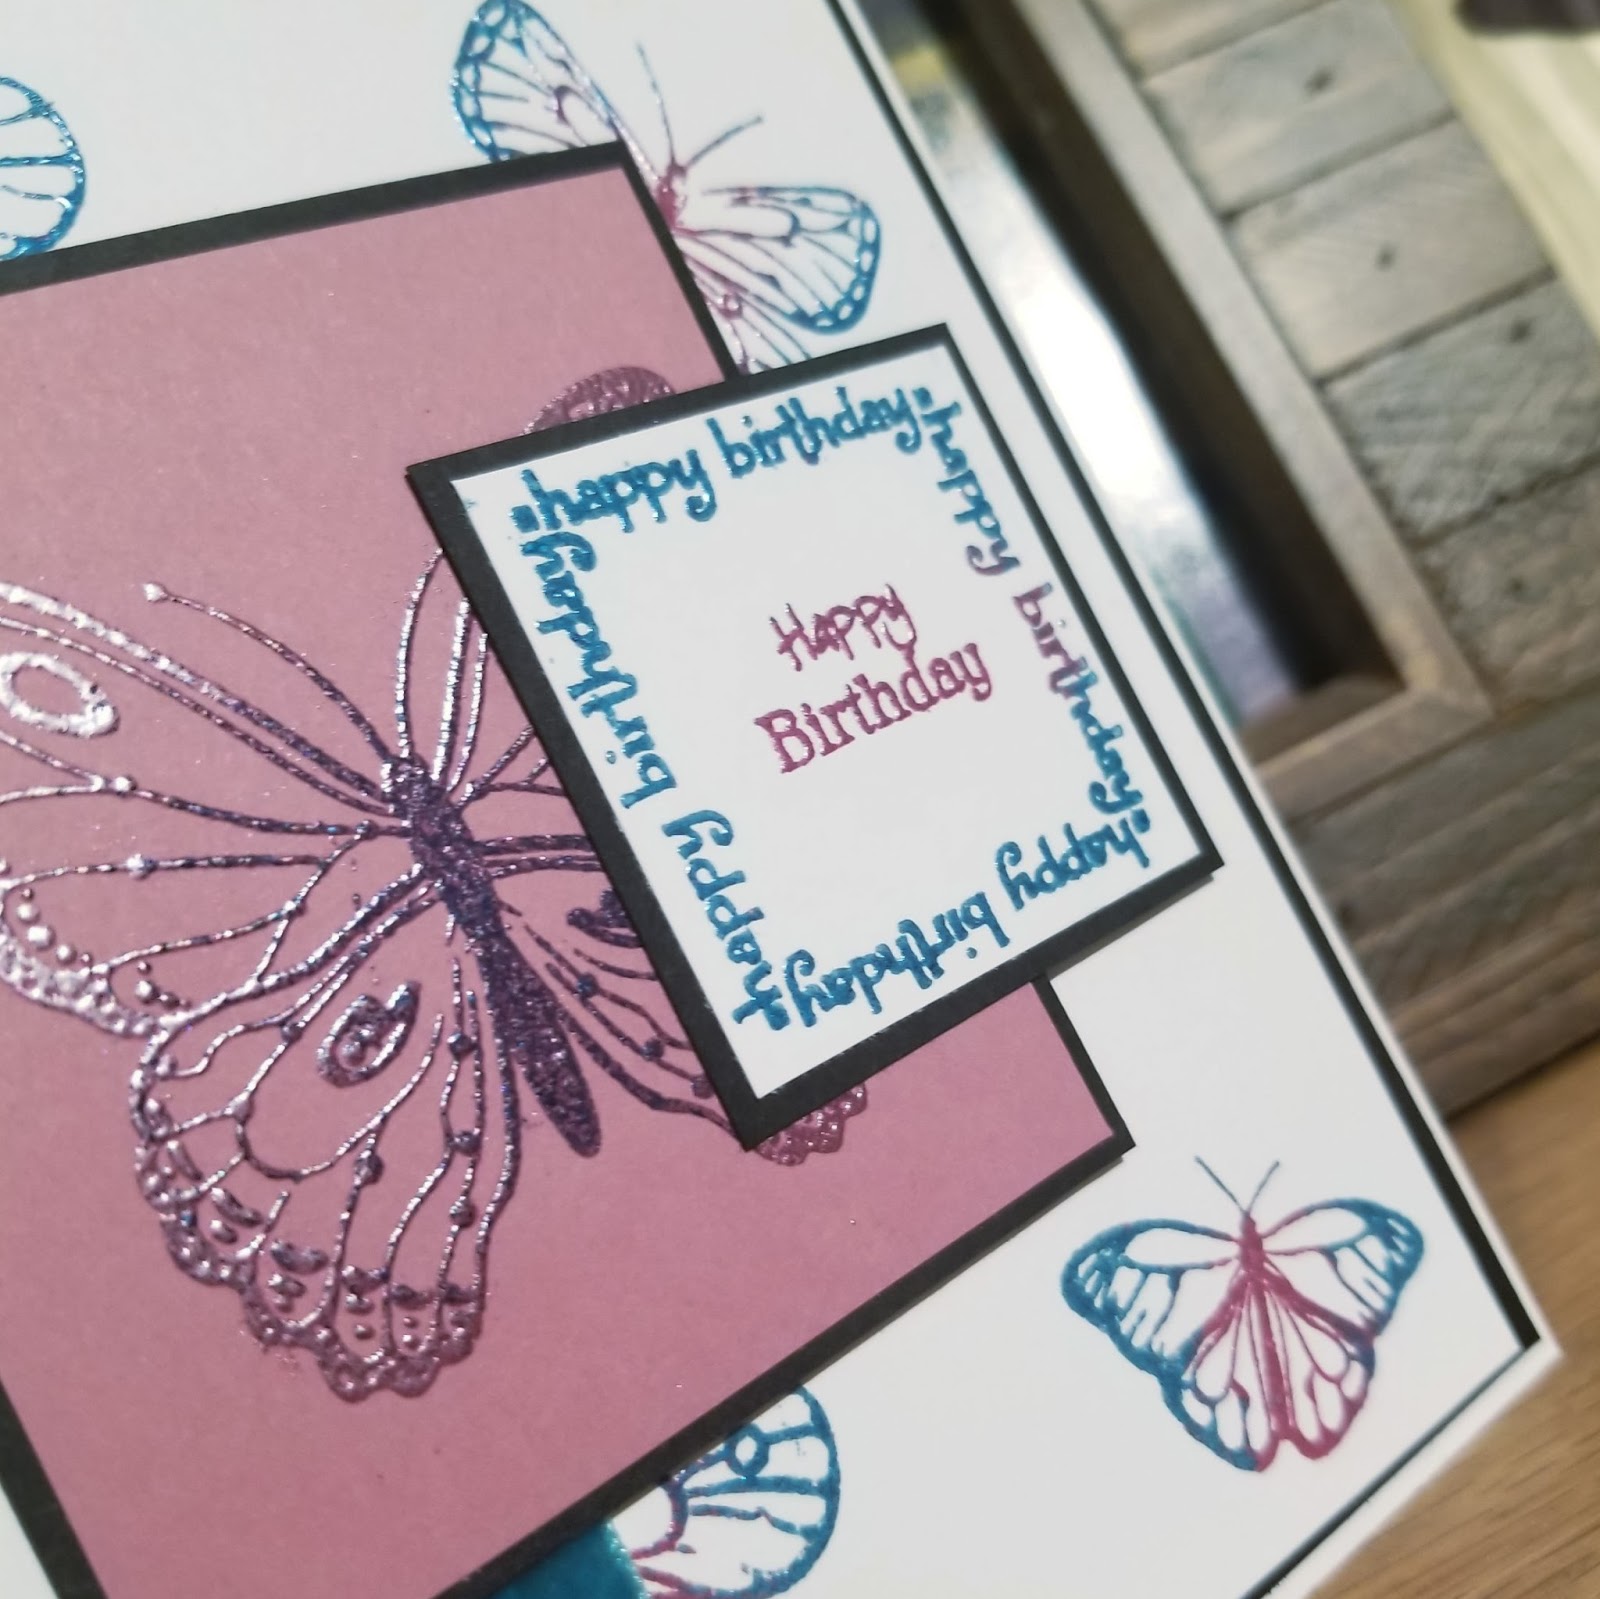
It's Rubbernecker Monday here on my blog. Every other Monday brings a new card made with Rubbernecker Stamps. This week I have made another card with the "Butterflies are Free" stamp set. This set includes four sentiments and four different butterflies, so there is a lot you can do with one set. I also used the "Nested Circle Scallop" die set and the coordinating Butterflies are Free die set. 

I used all three of the scallop dies in the set to make this card. I created a circular card base that is just a little smaller than the largest scallop die, so the scallop detail really pops off the edges of the card. I used Stampin' Up paper and ink in Sweet Sugarplum. I layered the die cuts, heat embossed the sentiment, and added a die cut butterfly to finish it off.

Stop by the blog tomorrow to check out the newest challenge. The prizes are a $25 and $15 gift certificate for first and second place, respectively. Below are the direct links to the Rubbernecker products used on my card:


Monday, 29 January 2018

Birthday Butterflies

Hello all! I'm back with more Rubbernecker Stamps! I have made a birthday card with the Butterflies 2 and Happy Birthday clear sets. I love butterflies and I love this HB set because it has so many different sized sentiments. It's got whatever you need!

I used a variety of butterflies set to create a background mat for the card with VersaMark ink and heat embossing. I used a blue and a pink powder for a two-tone look, and used the same on the sentiment stamps. I used two of the HB stamps:

Butterflies 2 & Happy Birthday

You can make so many different types of cards with these butterflies. They are fantastic!

Tomorrow is the start of a new challenge on the Rubbernecker Blog. Make sure you pop over to the challenge page and see what the theme is this fortnight. The prizes for first and second place are a $25 and $15 gift certificate respectively.

Monday, 17 July 2017

More Butterflies and Birthdays

Hello! Back again with another new clear butterfly set from Rubbernecker Stamps. I've paired Butterflies 2 with the Happy Birthday clear set for another birthday card. I love butterflies and there are a lot of people in my family, so I'm always in need of a good birthday card. There are eight stamps in the butterfly set, with a big and small version of four different butterflies. I've used one of each butterfly on this card.


I colored the butterflies with Copics, then fussy cut them out. I picked out my paper from Stampin' Up first, then matched my markers to the paper colours. 

Make sure you stop by the Rubbernecker blog to check out the other beautiful cards made by our talented DT ladies. I will have another card up tomorrow for the blog challenge, so pop by tomorrow to see what the challenge theme is. 

The stamps I used for this card are listed below:

Monday, 3 July 2017

Butterflies and Birthdays

Team 1 is back with some inspiration for you from Rubbernecker Stamps this week. There is also a new challenge going live tomorrow so make sure you check back in for that. Today I have made a birthday card using Butterflies 1 and the Happy Birthday set.


I coloured the butterflies with Copics, using R80s. I was in a black, white, and pink mood today, if you can't tell. I used some heart patterned paper, but kept it pretty simple overall. I wanted the butterflies to really pop. 

Make sure you stop by the Rubbernecker blog to check out the other beautiful cards made by our talented DT ladies. I will have another card up tomorrow for the blog challenge, so pop by tomorrow to see what the challenge theme is. I had a lot of fun with it. 

Monday, 13 February 2017

Fluttering By

Hello! Today I have a card I made using Butterfly Inchies and Fluttering By from Rubbernecker Stamps.


I made the background with the Inchies stamp and Ken Oliver Color Burst pigments. I sprayed a piece of watercolour paper with some water and then sprinkled the orange, yellow and crimson pigments from the Brights collection right on the wet paper. The colours took over and spread creating a colourful background. Because watercolour paper is not smooth, you can't see all the detail of the stamp, but when used on smooth stamping paper, it has nice, clean, detailed lines. It's a perfect stamp for creating a background. I used it on a previous card with Versamark ink and clear embossing powder. You can see that card here: http://colourmyhearts.blogspot.ca/2016/07/rubbernecker-stamps-showcase-butterflies.html . The butterflies are from a Martha Stewart punch, my other paper is from Stampin' Up.

Please stop by the Rubbernecker blog for bi-weekly challenges. We have a new one starting on Tuesday, February 14. The prizes are a $25 gift certificate for 1st prize, and a $15 gift certificate for second prize. 


Monday, 5 September 2016

Wisteria Sprite from Aurora Wings

Today is a BIG BIG day for me!! It's my debut as a member of the Stella Design Team at Aurora Wings!! I was so excited when Mitzi asked me to join the team! Of course, I said YES, and here I am today bringing you my first project as part of the team and announcing the new Stella challenge theme which is "Fantasy". Most everything at Aurora Wings is fantasy, so the door is wide open for you to create something wonderful with one of her amazing images. 
I used Wisteria Sprite to make a card. The image is printed at about 5" x 4" and I've mounted it on a 6" x 6" card base. I coloured the image with Prismacolor pencils. A list of the colours I used for her petals and leaves is at the bottom of this post. To colour her skin, I followed along with a Kit and Clowder Create & Learn class from a few months ago. The skin effect in that class was quite luminescent and had that purple undertone that I thought would work well with my Wisteria colours. The purple/blue colour I used on her skin was also incorporated into her petals so it all tied together.

All of the paper is from Michele R Design's Sophie Rose collection. I've used a few different dies on this card including: By DieZyne Butterflies & Puffy Things and Stitched Ovals, and Stampin' Up Flourish Thinlits. I used Liquid Pearls for the little details in the flowers near her hair because I wanted them to pop and I needed the dimensional effect the Pearls gave me.
By DieZyne Butterflies die, detail of the Liquid Pearls
I've layered the card with cheesecloth, lace, and shapes from the dies mentioned above. After I attached the image with foam tape, I added some mulberry paper flowers.
Stampin' Up Flourish Thinlits
As usual, working with pencils is time consuming. It always a labour of love to create something with pencils, but I think it is totally worth the extra time and effort it takes.

Please check out the AW blog for details about the current challenge, and check out my fellow team member's blogs too. They are so talented and deserve some love! Don't forget that the Facebook group (Stamps by Aurora Wings) has a monthly challenge as well. If you aren't a member over there, go join! There is always some super amazing inspiration!

Here is the list of the Prismacolor pencils I used on this image:
Indanthrone blue
Dahlia purple
Parma violet
Lilac
Deco pink
Sunburst yellow
Lemon yellow
Dark green
Grass green
Spring green

Tuesday, 21 June 2016

Make Mine Girly Girl

Hello out there!! It's time for a new challenge in The East Wind's Facebook group. The theme this month is "Make Mine Girly Girl". I used 'Aurora Maple' for my card and cropped the image. 

I coloured the image with Copics. All of my flowers are from Wild Orchid Crafts. The DP is from DCWV mat Citrus Stack. The butterfly punch is from Martha Stewart.

If this image looks familiar to you, and you know Kit and Clowder, then you will see this image in the Skin and Hair class. I coloured it along with Alyce in the "Close up facial features and eyes" video. It is such an amazing class; I really encourage you to buy this image from TEW and then go enroll in the class. You won't be sorry. ;-)

This contest runs from June 21 - July 17. The first place winner wins three images of their choice from the Etsy store, and the second place winner receives a 25% off coupon to the store. Stop by and join us!!
There are also twice monthly challenges on the blog, so drop by there too and see what's going on and sign up for the newsletter. A freebie goes out on the 1st of every month!


Tuesday, 5 January 2016

Forget Me Not

Today sees a new release from The East Wind called Aurora "Forget Me Not". She is so pretty and I couldn't wait to colour her up!


I coloured her with Copics, and I used paper scraps from my stash so I don't know which DP this is. I also used rubber stamps from Finnabair's "Don't Forget to Fly" collection. I kept it simple, with a sketch from a challenge on the Paper Crafting Support Group on Facebook.

Make sure you stop by our TEW Facebook group to join in on our monthly challenge. There's still lots of time to submit something for the "Oh, the weather outside if frightful" challenge, which ends January 17. There are also twice monthly challenges on the BLOG!

Thanks for stopping by!!

Wednesday, 8 July 2015

Mixed Media Attempt

I really love mixed media. I don't know all the ins and outs of it yet, but I'm learning, and that's half the fun. The other half is frustration and uncertainty. "How do I do this? Is that enough? Should I do more?" The questions are endless in the beginning, or so it seems. I have a lot more questions than answers, and not a lot of time to watch tutorials on YouTube. Apparently, I'm going to need a few more hours in my day, and a much bigger jug of gesso. 

So here goes, a little mixed media piece I did for my niece's birthday. 


I picked up an initial at Michaels, a couple of wooden embellishments ("love", the dolphin, and a butterfly), used a metal butterfly from my stash, along with some flowers, buttons, and a polka dot stencil. I made some texture paste from talc powder (have a good collection of that from my twins, now that they're out of diapers), white glue, and gesso. Did I mention I need a bigger jug of that? I will need some more glue too, from the looks of it. My husband will be so happy I need to go buy MORE stuff for my crafting addiction. 

I applied gesso on everything. After it was dry on the letter I used the stencil and the texture paste to create the raised dots. Then I glued everything on with Beacon's 3-in-1 glue. Then I started spraying. And that was the hard part. I used Lindy's Stamp Gang sprays in Victorian Bouquet. Mostly I used the Purple Teal and the Hydrangea Blue, along with some Rambling Rose Pink. I used the other two colours in the set also, but didn't like the way they were coming together, so I went over them. After it dried overnight, I added some Pretty in Pink Pink from the Totally 80's set. This was the hard part because I had a hard time deciding when to stop, what to spray where, and what colours. I was really overthinking it. 

After the sprays dried I randomly applied some Viva Decor Inka Gold in Silver. Then I went over the raised bits with Viva Decor Precious Metal Colors in Silver Red. And that was it. Done! I'm not putting anything else on there. I could keep adding and adding, but I really need to step away from it. 

I hope you like it. Thanks for stopping by!!

Monday, 16 March 2015

White Poppy by Aurora Wings

I love Aurora Wings. One of my very first blog posts was about some of Mitzi's flowers. I don't have as much time to colour them as I used to, which is sad because they are so beautiful. I bought three of her colouring books (yes, she has colouring books with these beautiful images in them), and I don't know how many digital stamps. This is White Poppy, and I coloured her for a card that I sent to a friend that was feeling blue.  
I coloured this with Copics. All of my embellishments are from Wild Orchid Crafts, except for the purple ribbon rose, which I made. I think I need some more practice doing THAT. It was not as easy as the lady on YouTube made it look. I also used a Spellbinders die for the mat.
The Copics a I used are as follows:
Skin - E000, E00, E21, E11
Hair - BG90's
Poppies - R80's
Butterfly Wing Ears - BV20's

I'm entering this into the following challenges:
Aurora Wings - Anything Goes Challenge
Scrapper's Delights - ATG
Craft Your Passion - ATG
Party Time Tuesdays - ATG

I hope you like it. Thanks for visiting!

Saturday, 14 March 2015

Ppinkydolls!!

I have such an exciting announcement today! A couple weeks ago Chrishanthi at Ppinkydolls asked me to be on her Design Team!! It is always a thrill to be asked to be on someone's DT because it  means someone appreciates what you do, and that is always a great feeling. I really love her images. They are quirky and unique, and I love things that are out of the mainstream. 

There is a Facebook challenge going on right now at the Ppinkydolls Facebook page, with the theme "Spring Friends". Submit an entry made with a Ppinkydolls image that has a Ppinky girl with an animal friend. EVERYONE that enters gets a free digi after the close of the challenge.

I have two DT inspiration projects for you today. My first one is "How Beautiful".


I coloured this with Copics. The paper is from Michele R Designs digital papers in Shabby Blue Charms, the pearls, flowers, dove and lace are all from Wild Orchid Crafts; the ribbon is from Michaels.
The Copics I used are:
Skin - E000, E00, E21, E11, E04
Hair - E40's
Dress - V000, V01, V02, V04, V08
I dabbed Tim Holtz distress inks in Tumbled Glass and Squeezed Lemonade around the image with a damp sea sponge.

*                               *                                   *                                *                                 *
My second project is with the image "Unicorn Leslie".


I also coloured this with Copics. The paper is again from Michele R Designs, all my embellies are from Wild Orchid Crafts. The little butterfly I made with my Cameo. I actually made an entire sheet of them out of white cardstock and I will just colour them up as needed to match my projects. This one is dyed with Tim Holtz Distress Inks in Tattered Rose. I dabbed around the image with a sea sponge using Tim Holtz Distress Inks in Tattered Rose, Tumbled Glass, and Broken China.
Copics used:
Skin - E000, E00, E21, E11, E04
Hair - E50, E53, E55
Dress - B0000, B00, B02, B04, B05, B39
Unicorn - C00, C1, C3, C5 and R80's for it's mane
I really tested my art skills here and tried to draw a little cobblestone path with W7-W0 to ground the image. Drawing is not something I'm good at, but I think it turned out okay.

I hope you like how my cards turned out! Thank you for stopping by and letting me share them with you. Make sure you check out the Ppinkydolls Facebook page, and her Etsy shop for a lot more of these fabulous images.

I'm entering this in The Corrosive Challenge Our Animal Friends challenge